How to remove OEM stereo from Toyota Previa Van (91 - 97)?

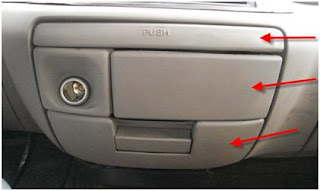
- Remove the fuse cover (it’s a pop-off cover) by pushing the latch indicated in the picture below.


- Once you push the button/latch you should be able to simply pickup and remove the cover as show below

- Remove the two outer screws: these are the top two of four screws holding the top of the wrapping middle front fascia on, to which the radio assembly is attached as shown in the picture below

- After removing the two screws you will have to remove the “Cup Holder”, “Ashtray”, and the liter compartment. These steps are little challenging so be patient. These three components should be removed in the following order to make life easier and prevent damage to your beloved PREVIA. Please see my “YouTube” videos for proper instructions:
1. Ashtray - https://www.youtube.com/watch?v=t0xRCgQzTIA
2. Liter compartment - https://www.youtube.com/watch?v=gYMFECuUnQM
 (Ashtray removed
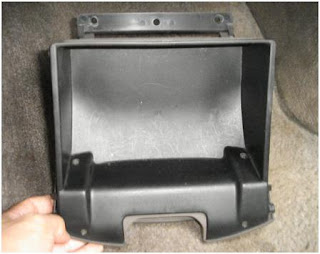
(Liter Compartment removed)
- Now comes the tough part (removing the Cup Holder) this was kind of complicated for me. Apparently there are two more lower screws holding the bottom of the wrapping middle front fascia on (these are just behind and above the screws for the cup holder/fascia), but before you can get to these screws you will have to remove FOUR screws (one in each cornor, there are two in the left side, but one is behind the lighter) to remove the cup holder as shown below.


- Once all FOUR screws are out you can feel the Cup holder and the cigarette-lighter is loose. Now you have to wiggle, push it back and slightly to the right and it should come out nicely and shown in the picture below

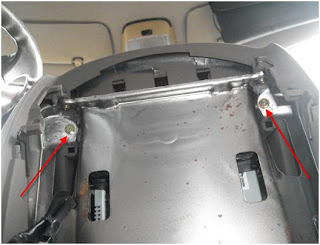
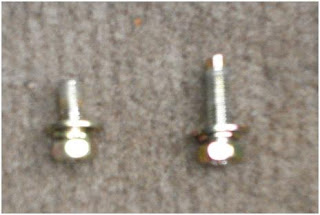
- Once this is removed you should see the two final screws (Note: the right screw is longer than the left so when reinstalling make sure you use the correct screws
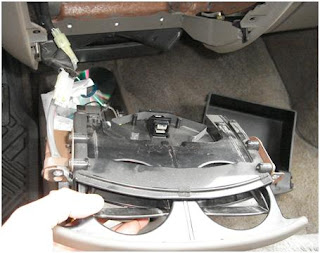
- After removing all four screws you should be able to easily pull out the CD/Radio wrapping as shown in my video: https://www.youtube.com/watch?v=9sk42yMXjWA

20 comments:
Thank you so much for putting this together, I had my Previa Van at a local Circuit City store for two days and they didn't know how to open the existing Previa Radio to install a new one I bought from them. They even brook part of my fascia while monkeying around with it...I was so pissed off, but with these instructions I was able to do all this myself in 2 hours.
Hi,
I read the contents you wrote and really found it so helpful for us. Thanks alot.
WE have a 7-seat Previa produced in this period (91-97), but we do not have the manual book. Therefore it's hard to understand all symbols in the car... If possible, would you please help to advise how I can get a copy of this book....
Many thanks for your help.
We are in Vietnam, Saigon city.
My email: ngocmani@gmail.com
Myname: Chau (Ms.)
Great TuT BUT could you PLEASE upload a video showing how to remove the cup holder as i can not do it and have scratched the side of plastic where the cigarette litter goes trying to remove it.
Thanks
Hi there
I have a 2002 Toyota Previa and have been trying for a while now to get the stereo fixed but have no idea how to get it out from the dash board. i have tried using this guide but can't find the latch for the fuse cover. Could you please post a guide on how to remove the stereo for this vehicle.
(not my actual car)
1997 was the last Previa model released in the US Auto Market. My instructions are for 1991 - 1997 models and I don't have access to the model you are talking about. You might want to check the Previa Repair/user's manual to see how you can remove your stereo..thanks
Perfect! Just what I needed...
Thanks for the great help with my Previa radio. I am a fairly serious, though not professional, mechanic. I maintain a 91 Previa. Would you like a collaborator on this site? I believe I could add some helpful content.
Great instructions, thank you! Removing cup holder was tricky indeed, everything else not at all. Thanks again!
I just did this in a 96 Previa LE, instructions were spot on. As for the whole lighter/cupholder assembly, once I had all the screws out, it kind of slid down and pushed in, then angled out the bottom opening so don't try to pull it out without pushing it down and in first. Definitely a bit tricky, but I did not have to remove the lighter from the unit, nor did I have to take the cupholder off separately, all came out as one.
But this was just to get to the instrument panel, anyone have a schematic for the lightbulbs for the instruments? My main lighting is out above the speedometer.
Cheers
To actually replace the radio should it just be a simple case of plug and play. The old stereo in my Previa is a Sony (but it's broken & doesn't work), and the new one I would like to buy will be a Sony so i'm guessing the connections would be the same and in that case just plug and play?
@ John: Since you are replacing an after market radio with another after market redio, you only need to make sure the new one is same hight/width and you might have to replace the connector (speaker wire connector) with the one that came with your new radio unless it uses the same harness...Good Luck!
Thanks Previa_Owner for this excellent guide, with it I have successfully replaced my car stereo. Without this guide.....I don't think I would have figured out how remove the panelling, some of the screws were in some hard to reach places!
Hey, Looking at install the ipad 2 in my van. Wonder if you looked at doing anything like that in yours. It seems there would be enough metal in the stereo area to mount the attachment for the http://www.mygoflight.com/mounts/
Ken
http://previaroadtrip.blogspot.ca/2007/06/van-preparations-for-2012-trip.html
Just installed a new stereo in my 1995 Previa made easy with these timeless instructions. Thank you!
YOU ARE THE MAN. I followed the steps you wrote and really found it so helpful , I replace the radio in my toyota previa, it was no to easy but the instructions are clear and I got it. Thanks alot.
Thanks all for your support!
I no longer own a Previa Van, but i kept this blog up to help other proud Previa owners.
years later, people still getting value out of this blog post. Thanks for your time and effort, helped us from making mistakes and breaking any of the dash pieces.
Thank u!
Which Pioneer stereo would fit on my 95 LE S/C AWD ? Any Double-Din size unit would fit ? Which antenna would also work on my Previa ? (preferably can receive HD radio)
Thanks in advance,
Isao
Post a Comment